
Mac Dictation for Email Setup: 7 Steps
To dictate emails on a Mac, turn on Dictation under Apple menu > System Settings > Keyboard. Then click in an Apple Mail or Gmail draft and use the Dictation shortcut to start speaking.
The setup takes 7 steps:
- Turn on Dictation and check that spoken words appear.
- Select English (United States) and check U.S. date and number formats.
- Choose a shortcut and test it in an email draft.
- Select and test the microphone in a quiet room.
- Set punctuation options and practice “new line” and “new paragraph.”
- Check accuracy with names, an email address, a date, and an amount such as $1,250.50.
- Dictate in Apple Mail or Gmail, stopping before switching fields.
Dictation creates a draft - not a checked email. Review recipients, wording, numbers, and attachments before sending. An optional tool, OneKey, can also turn spoken notes into an email draft.
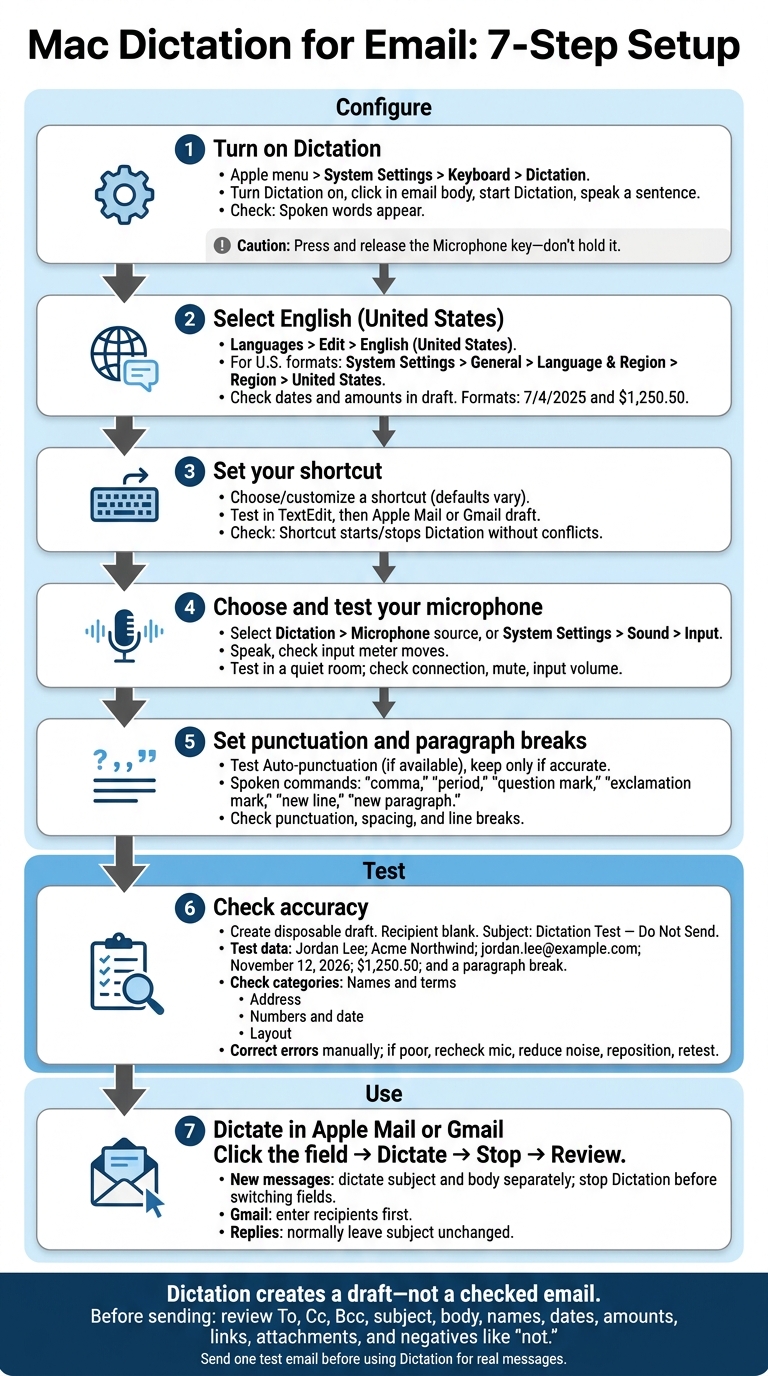
Mac Dictation for Email: 7-Step Setup
How To Use Dictation on Your Mac
sbb-itb-b6fe06e
1. Turn On Mac Dictation
Go to Apple menu > System Settings > Keyboard, turn on Dictation, and accept the prompt. Check that Dictation stays on.
Click inside the email body to place your cursor. Start Dictation using the dictation shortcut, the Microphone key, or Edit > Start Dictation. Press and release the Microphone key - don’t hold it. Holding it may activate Siri instead. Wait for the cursor to pulse or for a tone before you speak.
Say a short sentence, then stop Dictation with the shortcut or stop button. If your words appear at the cursor, Dictation is working. Next, set the dictation language to English (United States).
2. Select English (United States)
Go to Apple menu > System Settings > Keyboard > Dictation. Click Edit next to Languages, select English (United States), and confirm the change.
Add only the languages you use. To switch Dictation languages, use the language indicator or Globe key. Your input-source shortcut may not change the Dictation language.
Check that English (United States) is selected before speaking. This setting helps with U.S. spelling and vocabulary, but you should still review names, technical terms, and spelling in your email draft.
color and organize
For U.S. formatting, go to System Settings > General > Language & Region and set Region to United States. Then check dates, times, numbers, and currency in your draft. Dictation may format them differently even when your settings are correct.
Use month/day/year dates, such as July 4, 2025 or 7/4/2025; your preferred 12-hour AM/PM time format; and dollar amounts such as $1,250.50.
Next, set a shortcut you can use quickly in email apps before moving on to punctuation.
3. Set Your Dictation Shortcut
In Dictation settings, choose a shortcut or click Customize and press your preferred key combination. Follow the shortcut shown on your Mac, since defaults vary by model and macOS version. Pick one that’s easy to remember and doesn’t conflict with email shortcuts or other app commands. You can also use the Microphone key. A good shortcut helps you start Dictation without interrupting your email flow - but test it before using it in Mail or Gmail.
Open a blank TextEdit document and click inside it. Start Dictation, then wait for the Dictation mic before speaking. Once your text appears, press the shortcut again or press Escape to stop. Next, open a new draft in Apple Mail or Gmail, click in the message body, and check that Dictation starts there too.
If it doesn’t work, check that Dictation is on and your shortcut is selected. If the shortcut conflicts with another command, choose a different one or use Edit > Start Dictation.
4. Choose and Test Your Microphone
If your Mac shows Microphone source, select your built-in microphone, USB microphone, or connected headset. Choose Automatic to let macOS pick the device. If there’s no selector, go to System Settings > Sound > Input and choose your microphone there. Clear audio helps Dictation recognize names, numbers, and punctuation in email drafts.
In Sound > Input, speak and watch the input meter. It should move as you talk. If it doesn’t, check the microphone’s connection, mute control, and selected input device. Turn up the input volume if needed. Clear input also helps with punctuation and paragraph-break commands, covered next.
Position a headset mic near your mouth or a USB mic a few inches away. Keep the mic opening clear, and move away from fans, open windows, and loud keyboards. Use headphones so speaker audio doesn’t feed into the microphone.
Fix Microphone and Dictation Startup Issues
If macOS asks for microphone access, click Allow. Dictation uses system audio permissions rather than the email app’s permissions.
| Problem | Cause | Fix |
|---|---|---|
| Microphone access denied | Permission is disabled | Enable access for the affected app if it’s listed under System Settings > Privacy & Security > Microphone, then reopen the app. |
| Input device missing | Device is disconnected | Reconnect or re-pair the device, then select it under Sound > Input or Dictation > Microphone source, if available. |
| Dictation does not start | Setup or cursor placement is incorrect | Check the Dictation toggle and shortcut under Keyboard > Dictation, then click in the email body and try again. |
With the mic working, you can start using punctuation and paragraph commands.
5. Set Up Punctuation and Paragraph Breaks
Go to Apple menu > System Settings > Keyboard > Dictation and turn on Auto-punctuation, if available. Keep it on only if it adds commas, periods, and question marks correctly. Availability depends on your macOS version and dictation language. Test it in a draft email to see whether it keeps short messages readable without extra editing.
For manual control, say these commands:
“comma,” “period,” “question mark,” and “exclamation mark.”
To add a single line break or a paragraph break, use these commands, respectively:
“new line” and “new paragraph”
Dictation may wait until you pause to insert line breaks. Let it finish before repeating a command.
Try this in a blank Mail or Gmail draft:
“Hi Jordan comma”; “new paragraph”; “Thanks for sending the project details period I reviewed the timeline and have one question mark”; “new paragraph”; “Could we discuss it tomorrow exclamation mark.”
Check the draft for spacing, punctuation, and spoken command words that appeared as text. Fix spacing and line breaks manually before sending.
6. Check Email Dictation Accuracy
Test whether your punctuation settings produce a clean email draft. Open a disposable draft in Apple Mail or Gmail, leave the recipient blank, and set the subject to Dictation Test - Do Not Send. Your test message should include a name, a company term, an email address, a date, a dollar amount, and a paragraph break.
Dictate slowly and clearly, especially when speaking the email address:
Hello, Jordan Lee. Acme Northwind would like the proposal sent to jordan.lee@example.com by November 12, 2026, with a budget of $1,250.50. New paragraph. Please confirm the final delivery schedule.
Stop Dictation and review the entire draft, not just misspelled words. Check these four points:
- Names and terms: Jordan Lee and Acme Northwind are correct.
- Address:
jordan.lee@example.commatches exactly. - Numbers and date: November 12, 2026, and $1,250.50 are exact.
- Layout: Punctuation, spacing, and the paragraph break are correct.
Manually fix any errors in names, addresses, numbers, or paragraph breaks before using the draft in a real email.
If accuracy is poor, check that the correct microphone is selected under System Settings > Keyboard > Dictation. If that doesn’t help, reposition the mic, reduce background noise, and test the same draft again.
7. Dictate Emails in Apple Mail and Gmail
Once you’ve tested the language, microphone, punctuation, and accuracy, use your configured shortcut in Apple Mail or Gmail. Click the field, dictate, stop, and review.
Write or Reply in Apple Mail
Open Apple Mail and select New Message, or open an email and select Reply.
For a new message, click Subject and dictate your subject line. Stop Dictation, then click the message body and dictate your email. For replies, leave the subject unchanged unless it needs an edit.
Write or Reply in Gmail
Gmail uses the same process, but you’ll add recipients first. Open Gmail in a desktop browser and click Compose or Reply.
For a new message, enter the recipients, then click Subject and dictate the subject line. Stop Dictation before moving to the message body to dictate your email. For replies, dictate directly in the reply body and leave the thread subject unchanged unless it needs an edit.
Check the recipients, subject, and body for errors before sending.
Conclusion: Review Your Setup and Email Before Sending
Your Mac Dictation setup is ready. Send one test email before using it for real messages.
Before you send, check To, Cc, and Bcc. Then review the subject, body, names, dates, amounts, links, attachments, and negatives like “not.”
Optional: Turn Spoken Notes Into Emails With OneKey
OneKey can turn rough spoken notes into a draft email at your cursor. Before sending, check the draft’s tone, facts, dates, and numbers.
FAQs
Can I dictate emails on my Mac without internet?
Yes - offline dictation depends on your Mac model and the software you use. Apple’s built-in Dictation can process speech offline on Apple Silicon Macs (M1 and later) when the “Send to Apple” setting is disabled.
On older Intel-based Macs, Apple’s built-in Dictation typically needs an internet connection.
Does Mac Dictation keep my emails private?
Privacy depends on your Mac’s hardware and settings. Apple Silicon Macs can process speech entirely on-device, so your audio stays on your Mac. Older Intel-based Macs typically send audio to Apple’s servers. That requires an internet connection and comes with a privacy tradeoff.
Check your system settings to see whether your Mac supports on-device processing.
How can I improve recognition of unusual names?
Use macOS Text Replacement to turn abbreviations or phonetic spellings of names into their correct written forms. If your dictation tool offers a custom dictionary or vocabulary list, add names you use often, along with their variants.
When dictating, say the name in a complete sentence - not on its own - to give the tool context. Before sending your email, review it and manually fix any remaining errors.